» Home » Docs » Guides » How to start using (R)?ex
How to start using (R)?ex
This is a small how to showing the first steps with Rex.
Basic architecture

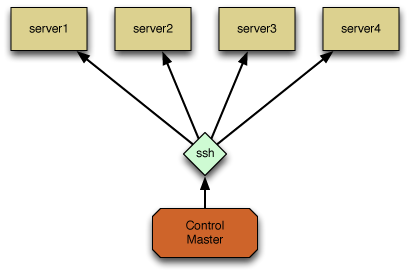
Rex is an automation framework which can manage local machines and uses SSH as an agent to manage remote ones.
Rex provides a simple DSL that is completely syntax-compatible with Perl. You can use it without any Perl experience if you want, but you can easily learn just enough Perl for Rex.
The starting point of every Rex project is the so-called Rexfile. You can think of this file like a Makefile. You can define your inventory, environments, authentication info and tasks in this file, among many other things.
A task is really just a bunch of related commands. For example installing a package, uploading the configuration file and starting the service. You can also call tasks from other tasks or create rollback scenarios to handle cases when something goes wrong during the execution.
Requirements
To run Rex you don't need much.
Control host
You can run Rex from your workstation or on a central control host.
Rex requires at least Perl 5.10.1 on this machine, and of course some modules as dependencies. For the best experience we recommend using the latest stable release of Perl. If you're using the packages provided by your OS distribution, or you install Rex from CPAN, then those dependencies will be installed automatically.
You can find information on the Get Rex page about how to install Rex itself.
Managed hosts
On the systems you want to manage you need only two things: a Perl 5 interpreter, and a valid account for the SSH server running there.
Rex only uses core Perl modules on the remote hosts, but some operating systems (e.g. RHEL/CentOS, Fedora, OpenWRT) might not supply all of them out of the box. In this case you might need to install them first, and this mostly means the Digest::MD5 module (but it depends on the OS, really). You can install this module with yum install perl-Digest-MD5.
If you want to run administrative tasks on the remote machines, you obviously would need root access on them, or at least sudo to escalate privileges.
Creating a Rexfile
First we need to create a new directory to store your Rexfile in it, and change to that directory:
$ mkdir my-first-rex-project
$ cd my-first-rex-project
Now change into this directory and create a file called Rexfile with the following contents:
use Rex -feature => ['1.4'];

user 'my-user';
password 'my-password';

group myservers => 'mywebserver', 'mymailserver', 'myfileserver';

desc 'Get the uptime of all servers';
task 'uptime',
  group => 'myservers',
  sub {
    my $output = run 'uptime';
    say $output;
  };
The special first line use Rex -feature => ['1.4']; enables all features that are available for version 1.4. If you want to know more about feature flags, please check out the How to enable or disable features page.
Executing the uptime task will login as my-user with the password my-password to all the servers in the group myservers and run the command uptime. You can run it like this:
$ rex uptime
Adding a second task
To add a second task, just add the next lines to your Rexfile.
desc 'Start Apache service';
task 'start_apache',
  group => 'myservers',
  sub {
    service 'apache2' => 'start';
  };
This task will start the service named apache2 on all the servers in the myservers group.
Display all tasks in a Rexfile
Use the following command to display all tasks in your Rexfile use the following command:
$ rex -T
Tasks
  start_apache                   Start Apache service
  uptime                         Get the uptime of all servers
Server Groups
  myservers                       mywebserver, mymailserver, myfileserver
Authentication
In the previous example we showed how you can login with a user and a password. Of course, it's easy to use key authentication instead, just add key_auth instead of password:
user 'my-user';
key_auth;
It is also possible to use your keys with a passphrase if you specify both key_auth and password:
user 'my-user';
key_auth;
password 'key-passphrase';
On Windows, you also have to point to your private and public keys:
user 'my-user';
private_key '/home/user/.ssh/id_rsa';
public_key '/home/user/.ssh/id_rsa.pub';
key_auth;
If you don't want to add your password or passphrase to the Rexfile, you can also get it from an external source, or you can use ssh-agent. Rex will automatically try to use it when you remove both password and key_auth.
And if you omit even user, it will just try to use the name of the currently logged in user.
For even more options, check out this Authentication page.
Managing services
Managing services really only need a few common steps: install, configure, and run (of course, add in destroy to get full life cycle management).
In this example you will learn how to install and configure an NTP server. You can adapt this example to any other service easily.
# Rexfile
use Rex -feature => ['1.4'];

user 'root';

group all_servers => 'srv[001..003]';

task 'setup_ntp',
  group => 'all_servers',
  sub {
    pkg 'ntpd', ensure => 'present'; # let's install the package first

    file '/etc/ntp.conf',                # then upload a configuration file
      source    => 'files/etc/ntp.conf', # use a source file under files/etc
      on_change => sub {                 # and execute something if the file has changed
        service ntpd => 'restart';       # in this case, restart the service
      };

    service 'ntpd', ensure => 'started'; # start the service now and also after reboot
  };
That's all.
This task will now install the ntpd package on your servers, upload a configuration file and start the service.
In case you wonder about the order of commands, Rex will always execute them from top to bottom.
If you want to learn more, it's probably best to continue reading about using modules and templates.